Okay friends, let’s talk wall decals.
Have you heard of them?
Shop Bio:
We make nursery wall decals. With our wall decals your nursery will come to life. My wife creates all our designs and I create the decals from scratch. Together we make a great team 🙂
Browse through all our wall decals and I’m sure you will find something you like. All our wall decals are made in matte finish and are fully removable. You can choose custom colors and have the decal re sized so it fits your nursery perfectly! -Etsy Profile
The best part about these decals is that they are removable {not reusable}.
You can just peel them off- {instructions are on the site too!}
This is perfect for us because we live in an apartment and we can’t paint.
So using decals is such a great way to decorate without having to re-paint afterward.
Here is Wyatt’s wall before:
Well, with the magic of Surface Inspired..
I was able to turn the main wall in Wyatt’s nursery from this…
plain.white.nothingness.
And after:
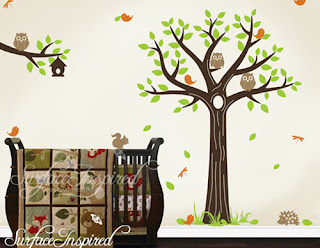
Into this..
adorable.owl.awesomeness.
The kit contains the decals, a plastic piece to smooth them on,
and a picture of what each piece is supposed to look like.
All you have to do is figure out where you want to place the decal, and begin.
I started with the tree trunk and worked from there.
Surface Inspired provides a video link {really helps to visualize the process}
that shows you the best techniques for applying the decals.
Here is how the decals come,
it is recommended that you lay them out flat for a few hours before applying.
I took this time to lightly wipe down the wall to remove any dust particles that would have effected the way the decals looked on the wall.
I taped down the trunk {largest part of the decal}
Then I lifted the white backing and peeled it off as I smoothed the piece against the wall.
“To install, simply pull away the decal with the transfer tape (from the backing paper) and place it on your wall. Run the squeegee over the decal to remove any bubbles. Peel away the transfer tape and… voila! Your decal stays on your wall and looks just like it’s painted on :)” -Surfaceinspired.com
So I began doing this, piece by piece.
The whole tree was numbered {see photo below} so I knew exactly where each branch had to go and what connected with what.
Easy peasy.
Here is the completed tree:
Then I started to add on the animals and the leaves.
This was much easier than applying the tree trunk. {Although they do recommend you have help- I did the tree alone. It just took a bit longer than it would have if there were two of us applying it.}
For the leaves and animals I just cut out that portion of the decal- removed the backing, stuck, flattened, and peeled. It was really simple.
Here is the little side branch with the bird house- so adorable!
More leaves and animals:
All done!
Some close-up photos:
How cute are these owls, seriously.
{the hedgehog/porcupine is William’s favorite part}
The whole wall:
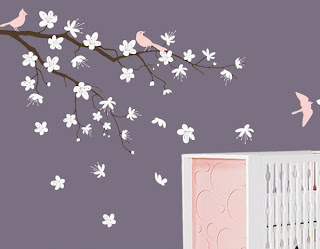
Here are some other lovely choices from the website & Etsy store:
Forget a nursery, I’d love this in MY room!
Love this one- I would totally do this if I had a baby girl-
I love that you can personalize it with their name!
And here is the stock photo of the one I chose:
Are you blown away with cuteness?
Want to get your own?
Well have I got a surprise for you!
20% OFF!!
yup, the folks at Surface Inspired have provided a discount code just for Songbirds and Buttons readers! How awesome are they?!
Want to learn more/see more decals/get inspired?
Surface Inspired Web site
Surface Inspired Etsy
Surface Inspired Facebook
If you stop by their Facebook- please tell ’em I sent ya!
Hope you enjoyed this post!
Have a lovey weekend!
Disclaimer: This post was sponsored by Surface Inspired- the opinions are 100% my own. I was sent a sample of the product but was not paid. I believe in full disclosure on my blog- I will always tell you the details regarding all products I review.
Sharing @: Super Mom Blog, Funky Junk Interiors, Tatertots & Jello, A Bowl Full of Lemons









I’ve always wondered about wall decals! My daughter has owls and birds in her nursery, so a tree would be perfect!
I’m not trying to toot my own horn or anything- but it looks SO GOOD! I was really impressed- my hubby was blown away when he walked in the room! I would love to see a pic of your daughters nursery- I need owl-spirtation!
You did a fantastic job on that wall. Love it.
Rosemary, thank you so much for your sweet words! I love it too! It makes me smile every time I walk into his room 🙂
That is super Cute! Love decals.. and love to make them too!
Thanks for visiting and following my blog.. following you now!
By the way I have a linky party every friday if you want to join us! 🙂
Angie
Awe, thanks Angie! I would love to join your linky party! 🙂 Nice to have you as a new blog friend 🙂
Love it! And that cute porcupine! Too fun! What a great decal, and amazing what it can do to a room! Super Sweet!!
Thanks Jen! I love it too! The porcupine is too cute! 🙂 It really did transform the room! Thanks 🙂
You did a great job, Kendall. Looks fantastic! Thanks for sharing. Joyfully, Jackie
P.S. And thanks for stopping by my Alaskan blog and leaving me such a nice comment!
Thanks Jackie! No problem! 🙂
Hi there thanks for linking up on my blog! I love these decals – my girls want to re-decorate their rooms & I am trying to encourage them to use these instead of painting in bright colours etc. because as you said at least you can remove these! 🙂
Exactly! I love that you don’t have to paint to spruce up a room anymore- there are so many other options! Your girls should definitely try out decals- I couldn’t believe how easy they were to apply!
I love the chalkboard speech bubble and the single large letter monogram! kids wall decals
I like these wall decals, these are looks very gorgeous. wall decals
Thanks for the review! I will be ordering from them this afternoon. I love that they are a Canadian Company!